Adding external services for Enterprise Data Loss Prevention (EDLP)
You can configure CASB to work with external services to manage user data, gather information about unsanctioned cloud applications, and other functions.
Many organizations have made a significant investment in an enterprise DLP (EDLP) solution. This investment not only counts the capital expenditure on the software and support but also the person-hours and intellectual capital to craft policies that meet the organization's needs. By adding a CASB to an organization, you can extend the access boundary from the endpoint, where traditional enterprise DLP lives, to the cloud and SaaS.
When CASB is integrated with an EDLP solution, policies can be configured to do the initial check on the CASB DLP, and then pass the file/data to the EDLP. Or it can pass everything to the EDLP or a combination of the two.
After the file/data inspection is complete, the policy action is taken. Examples of policy actions include these:
-
Encryption
-
Deny upload
-
Watermarking
-
Quarantine
-
Allow and log
-
User remediation
-
Replace file with a marker file
The following topics provide instructions for configuring external services for data loss prevention.
-
Creating a new configuration for EDLP
-
Downloading and installing an EDLP agent
-
Stopping and starting the EDLP agent
-
Symantec DLP response rule configuration for Vontu service
Creating a new configuration for EDLP
-
In the Management Console, go to Administration > Enterprise Integration > Data Loss Prevention.
-
Click New.
-
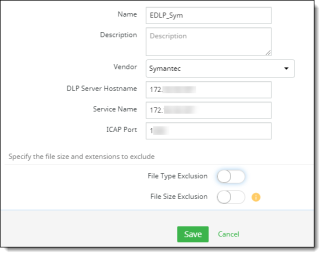
Enter the following configuration details. (The values shown are examples.)
-
Name -- Enter a name for this EDLP service.
-
Description (optional) -- Enter a brief description.
-
Vendor – Select an external DLP vendor. The options are Symantec or Forcepoint.
-
DLP Server Hostname -- Enter the host name or IP address of the server to be used for the external DLP.
-
Service Name -- Enter the name or IP address of the service that applies to this configuration.
-
ICAP port -- Enter the number for the associated Internet Content Management Protocol (ICAP) server. ICAP servers focus on specific issues such as virus scanning or content filtering.
-
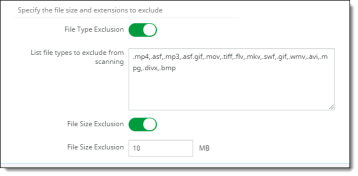
To exclude any file types or size from EDLP scanning, click the toggles to enable exclusions. Then, enter the appropriate file information.
-
For file types, enter the extensions for the file types to exclude, separating each extension by a comma.
-
For file size, enter the maximum file size (in megabytes) to exclude.
-
Click Save.
The new configuration is added to the list. Once an agent is downloaded and installed, a connection can be made. A successful connection is indicated on the Data Loss Prevention page by a green connector icon.
Downloading and installing an EDLP agent
After you create at least one EDLP agent, you can download the EDLP agent and install it on a machine or server. The machine you choose for the EDLP agent installation should contain RedHat Enterprise / CentOS 7.x and Java 1.8.
Prerequisites for installing the EDLP agent
Your environment must include the following components and settings for installing and running the EDLP agent:
-
Oracle Server Java 11 or later
-
JAVA_HOME environment variable set
-
root or sudo privileges
-
Hardware – 4 Core, 8 GB RAM, 100 GB storage
Perform the steps outlined in the following sections to download, install, and start the EDLP agent.
Downloading the EDLP agent
-
In the Management Console, go to Administration > System Settings > Downloads.
-
Select EDLP Agent from the list and click the Download icon under Actions.

To view information about the file, including version, size, and checksum value, click the Information icon.

The EDLP agent is downloaded as ciphercloud-edlpagent-20.07.0.22.centos7.x86_64.rpm.
-
Move the EDLP agent to its intended machine.
Installing the EDLP agent
-
From the command line, run the following command:
rpm -ivh <RPM Name>
For example:
rpm -ivh ciphercloud-edlpagent-20.07.0.22.centos7.x86_64.rpm
Preparing... ################################# [100%]
Preparing / installing...
1:ciphercloud-edlpagent-20.07.0.22.centos7.x86_64########################
## [100%]
Execute 'EDLP-setup' to setup your EDLP Agent
The RPM client will be installed under the following location:
/opt/ciphercloud/edlp
-
Go to the /opt/ciphercloud/edlp/bin directory.
-
Run the setup file using the following command:
./edlp_setup.sh
-
When prompted, enter the auth token to complete the installation process.
To get the auth token, go to Administration > Enterprise Integration > Data Loss Prevention (Auth Token column).

To hide the auth token from view, click the Column Filter icon at the upper right, and uncheck Auth Token.

Note
You can access logs from the /opt/ciphercloud/edlp/logs directory.
Stopping and starting the EDLP agent service
-
To stop the EDLP agent service, enter the following command:
systemctl stop ciphercloud-edlp
-
To start the EDLP agent service, enter the following command:
systemctl start ciphercloud-edlp
Checking the EDLP agent status
-
To check the status of the EDLP agent service, enter the following command:
systemctl status ciphercloud-edlp
Symantec DLP response rule configuration (Vontu service)
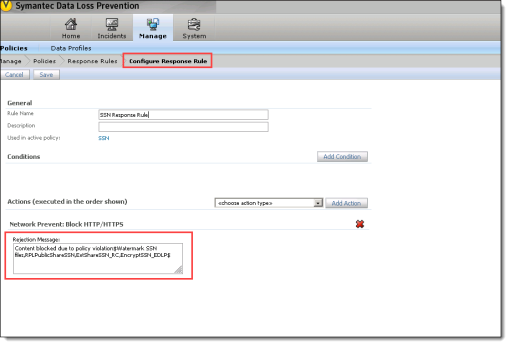
In the Symantec DLP configuration (Manage tab / Configure Response Rule), you need to enter information about the violation and the policies violated, as shown, with violation as the keyword. Enclose the name of each violated policy between dollar signs, separated by commas. The policy name or names should be exactly the same as they are entered in CASB. Format the policy entries as follows:
$PolicyNameA, PolicyNameB, PolicyNameC$
Configuring the Forcepoint Security Manager and Protector
Perform the following steps to configure the Forcepoint Security Manager and Protector:
-
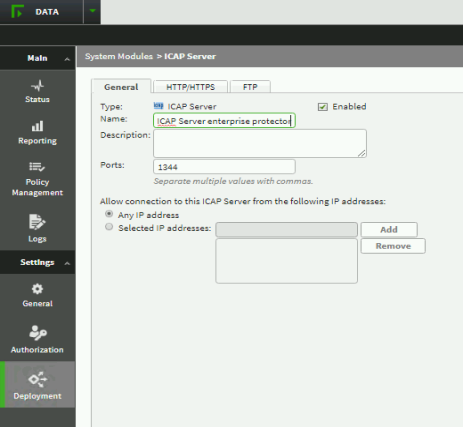
In the General tab, enable the ICAP system module with the default port of 1344.
-
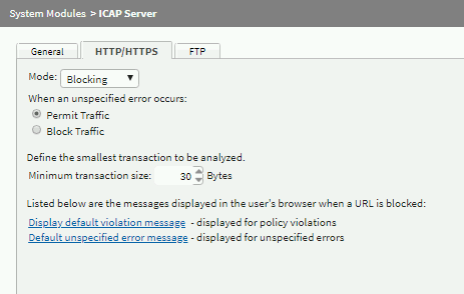
In the HTTP/HTTPS tab, set the mode to Blocking for the ICAP server.
-
Under Policy Management, add a new policy from the Predefined policy list or create a custom policy. Then, deploy the new policy.
